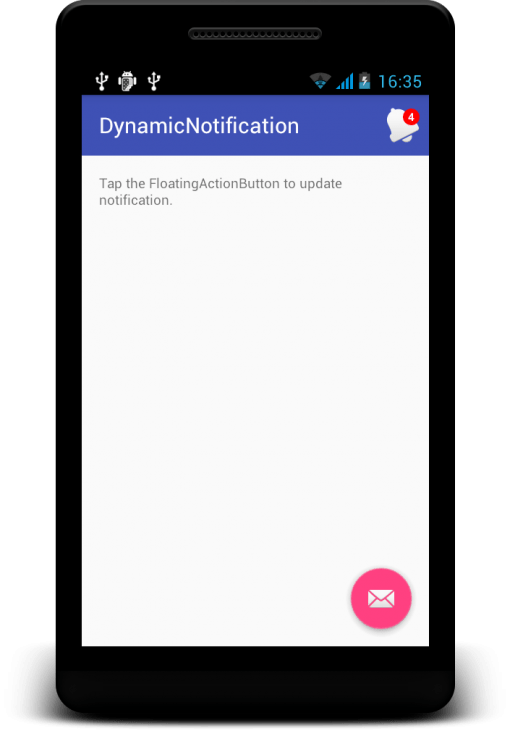
Bagaimana cara menampilkan notification count pada ActionBar menu seperti di Facebook. Simak langkah berikut ini:
- Membuat kelas BadgeDrawable, yang menangani perhitungan jumlah notifikasi dan background lingkaran berwarna merah beserta shadownya.
- Mendefinisikan LayerDrawable, pada xml yaitu berupa layer-list. Dimana layer bottom akan dijadikan ikon menu, sedangkan layer atas berupa BadgeDrawable.
- Update jumlah notifikasi dan menampilkannya pada BadgeDrawable.
Yak, langsung menjuju tekape..
1. Membuat kelas BadgeDrawable.
|
0 1 2 3 4 5 6 7 8 9 10 11 12 13 14 15 16 17 18 19 20 21 22 23 24 25 26 27 28 29 30 31 32 33 34 35 36 37 38 39 40 41 42 43 44 45 46 47 48 49 50 51 52 53 54 55 56 57 58 59 60 61 62 63 64 65 66 67 68 69 70 71 72 73 74 75 76 77 78 79 80 81 82 83 84 85 86 87 88 89 90 91 92 93 94 95 96 |
package Objects; import android.content.Context; import android.graphics.Canvas; import android.graphics.Color; import android.graphics.ColorFilter; import android.graphics.Paint; import android.graphics.PixelFormat; import android.graphics.Rect; import android.graphics.Typeface; import android.graphics.drawable.Drawable; import com.myexperimen.hangga.dynamicnotification.R; /** * Copyright (C) PT. Sebangsa Bersama - All Rights Reserved * Unauthorized copying of this file, via any medium is strictly prohibited * Proprietary and confidential * Originally written by Hangga Aji Sayekti, 07/12/15 */ public class BadgeDrawable extends Drawable { private float mTextSize; private Paint mBadgePaint; private Paint mTextPaint; private Rect mTxtRect = new Rect(); private String mCount = ""; private boolean mWillDraw = false; public BadgeDrawable(Context context) { mTextSize = context.getResources().getDimension(R.dimen.txt_notif_size); mBadgePaint = new Paint(); mBadgePaint.setColor(Color.RED); mBadgePaint.setAntiAlias(true); mBadgePaint.setStyle(Paint.Style.FILL); mTextPaint = new Paint(); mTextPaint.setColor(Color.WHITE); mTextPaint.setTypeface(Typeface.DEFAULT_BOLD); mTextPaint.setTextSize(mTextSize); mTextPaint.setAntiAlias(true); mTextPaint.setTextAlign(Paint.Align.CENTER); } @Override public void draw(Canvas canvas) { if (!mWillDraw) { return; } Rect bounds = getBounds(); float width = bounds.right - bounds.left; float height = bounds.bottom - bounds.top; // Position the badge in the top-right quadrant of the icon. float radius = ((Math.min(width, height) / 2) - 1) / 2; float centerX = width - radius - 1; float centerY = radius + 1; // Draw badge circle. canvas.drawCircle(centerX, centerY, radius, mBadgePaint); // Draw badge count text inside the circle. mTextPaint.getTextBounds(mCount, 0, mCount.length(), mTxtRect); float textHeight = mTxtRect.bottom - mTxtRect.top; float textY = centerY + (textHeight / 2f); canvas.drawText(mCount, centerX, textY, mTextPaint); } /* Sets the count (i.e notifications) to display. */ public void setCount(int count) { mCount = Integer.toString(count); // Only draw a badge if there are notifications. mWillDraw = count > 0; invalidateSelf(); } @Override public void setAlpha(int alpha) { // do nothing } @Override public void setColorFilter(ColorFilter cf) { // do nothing } @Override public int getOpacity() { return PixelFormat.UNKNOWN; } } |
2. Mendefinisikan LayerDrawable berupa layer-list. Kemudian berkas xml-nya sy beri nama ic_menu_notif.
|
0 1 2 3 4 5 6 7 8 9 10 11 |
<?xml version="1.0" encoding="utf-8"?> <layer-list xmlns:android="http://schemas.android.com/apk/res/android"> <item android:id="@+id/ic_notification" android:drawable="@android:drawable/ic_popup_reminder" android:gravity="center" /> <!-- set a place holder Drawable so android:drawable isn't null --> <item android:id="@+id/ic_badge" android:drawable="@android:drawable/ic_popup_reminder" /> </layer-list> |
Kemudian isilah icon [attribute value] pada menu dengan ic_menu_notif.
|
0 |
<strong>android:icon="@drawable/ic_menu_notif"</strong> |
|
0 1 2 3 4 5 6 7 8 |
<menu xmlns:android="http://schemas.android.com/apk/res/android" xmlns:app="http://schemas.android.com/apk/res-auto" xmlns:tools="http://schemas.android.com/tools" tools:context=".MainActivity"> <item android:id="@+id/action_notif" android:title="@string/action_notif" <span style="color: #ff0000;"><strong>android:icon="@drawable/ic_menu_notif"</strong></span> android:orderInCategory="100" app:showAsAction="always" /> </menu> |
Buka kelas MainActivity.java, kemudian override method onCreateOptionsMenu();
|
0 |
private LayerDrawable icon; |
|
0 1 2 3 4 5 6 7 |
@Override public boolean onCreateOptionsMenu(Menu menu) { // Inflate the menu; this adds items to the action bar if it is present. getMenuInflater().inflate(R.menu.menu_main, menu); MenuItem item = menu.findItem(R.id.action_notif); icon = (LayerDrawable) item.getIcon(); return true; } |
3. Simulasi, update jumlah notifikasi.
|
0 1 2 3 4 5 6 7 8 |
FloatingActionButton fab = (FloatingActionButton) findViewById(R.id.fab); fab.setOnClickListener(new View.OnClickListener() { @Override public void onClick(View view) { Snackbar.make(view, "Replace with your own action", Snackbar.LENGTH_LONG) .setAction("Action", null).show(); setBadgeCount(icon, mNotifCount++); } }); |

Referensi:
